The ID Editor is used to edit the ID Names and ID Values used in the PowerBASIC Forms Project, and are ultimately used to create numeric equates within the generated PowerBASIC code. Within the ID Editor, you may easily sort, reorder, renumber, add, and edit the list of IDs in use. The ID Editor can also be used to indicate where each identifier is being used in the project, and remove redundant entries en masse.
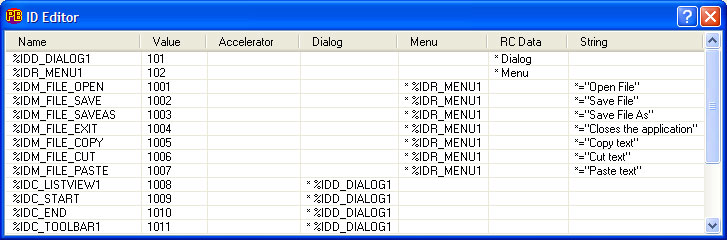
The ID Editor is accessible from the toolbar button, the Tools drop-down menu, or with the CTRL+SHIFT+I hot-key combination. When launched, the ID Editor dialog looks something like this:
The first two columns are the most important - they contain the ID Name and ID Value of each identifier (equate). The remaining columns indicate where the identifier is used in the project, and these are shown prefixed with an asterisk, such as "*%IDD_DLG1". If an identifier has an associated string entry (for example, a menu item has a prompt string), the String field will contain an asterisk to indicate the presence of an associated string, but the string itself is not displayed if the string is in a string table in a resource file.
The ID Editor interface is designed to be easy to use, offering both keyboard and mouse control, however, mouse control offers more flexibility and range of options than pure keyboard control. For example, identifiers can be manually reordered by using the mouse to click and drag an identifier to the intended position in the list. After reordering, a selected block of identifiers can be renumbered through the context (right-click) menu.
The Drag+Drop reordering facility makes it very straightforward to reorder and renumber identifiers project-wide. Multiple identifiers can also be reordered with a Drag+Drop operation, provided the selected identifiers are in a consecutive sequence.
To select multiple identifiers, hold down the CTRL key while clicking each of the intended identifiers, then perform a Drag+Drop on the selected block. A consecutive sequence of identifiers can be most easily selected by clicking on the first identifier in the sequence in order to select it, then while holding down the SHIFT key, click on the last identifier in the list. Finally, proceed with the Drag+Drop operation.
The available options for the context (right-click) menu are as follows:
|
Edit |
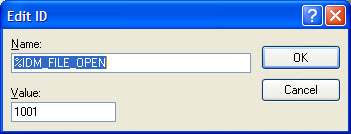
A resource identifier can be edited be double-clicking it in the ID Editor window, using the Edit item in the context (right-click) menu, or by selecting the identifier (single click) and then either pressing Enter or CTRL+E. The Edit ID dialog allows both the ID Name and ID Value to be edited:
If the ID Name is altered, PowerBASIC Forms automatically applies the change to any other project items that reference the original ID Name. The ID Name must comply with standard PowerBASIC equate and variable naming conventions. The ID Value must be in the 16-bit word range (1 through 65535). |
|
Add New |
A resource identifier can be added to the table through the context (right-click) menu, or by pressing CTRL+N, to display the Add New ID dialog. The Add New ID dialog has an appearance that is very similar to the Edit ID dialog, and requires the same ID Name conventions to be applied. |
|
Select All |
All resource identifiers can be selected through the context menu, or by pressing CTRL+A. When multiple identifiers are selected, PowerBASIC Forms can renumber the identifiers with ease. See Renumbering identifiers and Selecting multiple identifiers below. |
|
Delete |
When a resource identifier is not associated with a project item, such as when the original item was deleted, it may be deleted with either the Delete key, or with the Delete option in the context menu. PowerBASIC Forms prevents resource identifiers being deleted if they are still assigned to any project items. |
|
Renumber Selected |
This option is enabled on the context menu (and available through the CTRL+R hot-key combination) only when two or more resource identifier rows are selected in the ID Editor list. See Renumbering identifiers below. |
|
Order by Use |
Resource identifiers can be automatically reordered according to the project item that each identifier is associated. This option also deletes all unused resource identifiers, so should be used with care. Order by Use is available through the context menu, or with the CTRL+O keyboard combination, and because resource identifiers may be deleted, PowerBASIC Forms will ask for confirmation before performing the action. |
PowerBASIC Forms makes the task of renumbering a set of resource identifiers very straightforward.
By selecting two or more identifiers in the ID Editor list (see below), the Renumber Selected option (CTRL+R) brings up the Renumber Selected dialog. This dialog requests a Starting Value, and an Increment By value. By default, the starting value is taken from the first identifier that is selected, and uses an increment of one.
Unless cancelled, PowerBASIC Forms begins applying the new values to each of the selected resource identifiers, starting at the first item in the order shown on screen (not the order by which they are selected). As PowerBASIC Forms proceeds through each of the selected identifiers, it assigns a new ID Value, derived from the Starting Value and Increment specified.
For example, if we selected the following identifiers in the list:
%IDM_FILE_OPEN 102
%IDM_FILE_SAVE 1091
%IDM_FILE_SAVEAS 108
%IDM_FILE_CLOSE 2545
And used the Renumber Selected option with a starting value of 201, and an increment of 2, the result would be:
%IDM_FILE_OPEN 201
%IDM_FILE_SAVE 203
%IDM_FILE_SAVEAS 205
%IDM_FILE_CLOSE 207
|
Using the mouse |
| ||||||||
|
Using the keyboard |
| ||||||||
|
Once the identifier rows are selected, the Renumber Selected option becomes available in the context menu, and via the CTRL+R hot-key combination. | |||||||||
See Also
Selecting/linking dialogs and menus