Tab Order Editor
The Tab Order Editor provides a simple mechanism to set the tab stop
order for controls in a dialog. The tab stop order is also referred to
as the z-order, and this relates to the order in which controls are drawn
on the dialog. Therefore, setting the tab order affects the order of CONTROL
ADD statements in the generated code, and hence the tab order for keyboard
navigation of the controls on the dialog.
The Tab Order Editor can be activated by clicking the Tab Order toolbar
button  , using the Tab Order Editor option in the Tools menu,
or by the hot-key combination CTRL+SHIFT+T. When launched, the editor
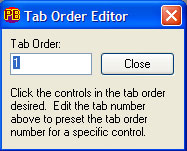
superimposes a set of small numbered buttons on each control on the dialog,
and provides a small window to alter the tab value and close the editor.
, using the Tab Order Editor option in the Tools menu,
or by the hot-key combination CTRL+SHIFT+T. When launched, the editor
superimposes a set of small numbered buttons on each control on the dialog,
and provides a small window to alter the tab value and close the editor.
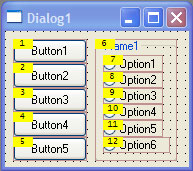
When selected, a typical tab order editing display will look something
like this:
Setting the tab order is very easy. Starting with the control that you
wish to have initial keyboard focus set to when the dialog is displayed,
click its associated yellow numbered label, or any portion of the control
associated with the yellow label. This will set that control to tab order
number 1, and automatically advance the tab order counter to the next
value.
For each of the remaining controls on the dialog, click each of the
controls or their associated yellow numbered labels in the desired tab
order for the dialog. Where controls physically overlap one another, clicking
only on the yellow label of the affected controls will help ensure the
intended control is targeted.
When all controls are numbered correctly, click the Close button in
the Tab Order Editor dialog, or simply press the ESCAPE key to end the
tab order editing session.
If a mistake is made during the renumbering process, simply change the
value in the Tab Order control in the Tab Order Editor dialog, then click
the control that should have that number, and proceed as before. Alternatively,
set the Tab Order value back to 1 and start over.
Programming
considerations
The tab order of controls is a very important design consideration for
the user interface of any application. Despite the prevalence of the mouse,
many users prefer to use the keyboard to navigate and interact with applications,
especially in areas such as data entry.
Therefore, application programmers should endeavor to present a clean
and instinctive application user interface to the end users. After carefully
overlooking an intuitive keyboard accelerator design for their dialogs,
programmers often follow this up by overlooking the importance of a logical
tab order for the controls on their dialogs too. The Tab Order Editor
can help plan and manipulate the tab order of controls in a dialog, helping
ensure the keyboard interface to the application is always first-rate.
Technically, the tab order denotes the sequence that keyboard focus
shifts from control to control, in an application dialog. The tab order
is navigated by the use of the TAB key to move keyboard focus forward
to the next control, and SHIFT+TAB to move the focus back to the previous
control.
Keyboard focus can appear on only one control at a time, and for most
control types, the control with focus is indicated by a dotted rectangle
drawn on its face, but there are exceptions. For example, the TEXTBOX
control indicates focus by the appearance of the blinking caret (cursor)
within the control, and a few controls do not provide any visual feedback
at all. These include the LABEL and ANIMATE controls, however it is unusual
to specify or require the %WS_TABSTOP style for such controls.
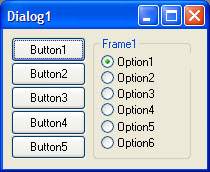
In the above dialog, keyboard focus can be seen on Button1. In this
dialog, we'll assume that the tab order has been set so that the buttons
have tab order numbers 1 through 5, and the option controls to 6 through
11. If the TAB key is pressed repeatedly, keyboard focus will move through
each of the buttons. Likewise, pressing SHIFT+TAB will move keyboard focus
backward. This is possible because each of the controls on this dialog
has the %WS_TABSTOP style.
On this basis, you may assume that the same behavior will occur when
keyboard focus gets to the option buttons on the right hand side. This
is where things get interesting, and the configuration of the correct
control styles plays an important part in getting the user interface behavior
correct.
First, we need to note the %WS_GROUP style assigned to the 1st button
and the 1st option button on the right side. These provide an additional
mechanism to allow the arrow/cursor keys to shift focus with a group of
controls. A group is defined as starting with a control with the %WS_GROUP
style, and ending just before the next control in the tab order with the
%WS_GROUP style. Therefore, in the dialog above, the five buttons form
a group, and the six option controls form a separate group.
With that in mind, you will find that as keyboard focus moves from the
button group to the option control group, focus is directed to the option
control that has a checked state. In the above dialog, this is Option2.
If focus is shifted with the TAB key again, focus switches back to the
button group, without touching any further option controls in the group.
This behavior makes it possible for a user to tab directly to the checked
option control with a minimum of keystrokes, using just the TAB key. Once
focus is at the checked option control, the check state can be changed
to another option control, simply by using the arrow/cursor keys to move
the keyboard focus within the group. This causes the newly focused option
control to become checked, and the previous control to become unchecked.
Finally, focus can be immediately switched away from the option control
group with the TAB key again.
One more important factor must be considered. When a dialog with option
controls is initially displayed, none of the option controls will have
a checked state (neither Windows nor DDT can possibly decide which control
should be selected!). Therefore, the application programmer should add
code to the project to explicitly set one control in each group of option
controls. This is typically performed in the %WM_INITDIALOG event handler
in the dialogs Callback Function. For example:
...
SELECT CASE CBMSG
CASE %WM_INITDIALOG
CONTROL SET OPTION hDlg, %ID_OPTION3, %ID_OPTION1,
%ID_OPTION6 ' Set the initial option states
FUNCTION = 1
CASE %WM_COMMAND
...
In that code, the CONTROL SET OPTION statement sets the checked state
to the option button with the ID of %ID_OPTION3, and all other option
buttons in the group %ID_OPTION1 to %ID_OPTION6 are unchecked. For more
information on option controls, please consult the PowerBASIC for Windows
documentation.
Another important aspect of the tab order is the association of LABEL
(Static) controls with controls that do not have a hot-key, such as the
edit control. For example, consider the following dialog:
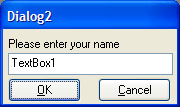
In this example, the edit control does not have a hot-key, but the LABEL
control above it does. If the user presses the hot-key for the LABEL control,
keyboard focus is directed to the next non-label control in the tab order.
If the edit control were not placed immediately after the LABEL control
in the tab order, the hot-key would activate the wrong control. Therefore,
the relative tab order of controls is a very important factor too, especially
when using many edit controls on one dialog.
The next topic describes the process of choosing a dialog for the design
environment, and the task of changing the links between menus and dialogs.
See Also
Menu Editor
Creating
a menu
Menu accelerators
Menu
Tutorial
Version
Info Editor
ID Editor
Selecting/linking
dialogs and menus
Test mode