
The fastest way to create a menu is to start off by entering the Captions for all the menus, then go back and enter all the Accelerator keys, then finally, go back and enter the Prompt text for each menu item. After each of these fields is entered, simply press the Enter key to move to the next item. Using this method, PowerBASIC Forms will assist to make the menu creation process very rapid and extremely simple. Let's explain this strategy in more depth.
The Menu Editor is designed to quickly create menus by typing the Caption then pressing the Enter key (which triggers the Next button) to move to the next item. The ID Name and ID Value are automatically assigned when the Enter key is pressed.
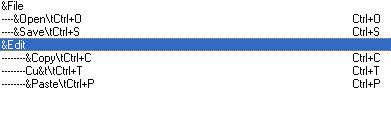
After typing the Caption for a Pop-up menu member, the next item is automatically assigned the Menu Item type and indented one level in the Structure Diagram box. This means the menu item is assigned to the drop-down menu displayed by the previous Pop-up menu member. For example:
When all the Menu Item members are defined for the current Pop-up, and a new Pop-up is to be entered at the root level, select the Pop-up option in the Type section, and then click the Unindent (left arrow) button. This moves the new Pop-up to the root-level. Next, type the Caption text for the Pop-up and press Enter. From there, the cycle can be repeated until all menus have been defined, primarily using the keyboard.
After entering all the captions, you can then return to the top of the list to add any accelerators, such as shown in the screen shots above. Returning to the top of the menu structure can be achieved by clicking on the first item listed in the Structure Diagram control, or by using the TAB key to navigate to the Structure Diagram control, then using the cursor keys to move the selection to the first item, etc.
See Also
Selecting/linking dialogs and menus