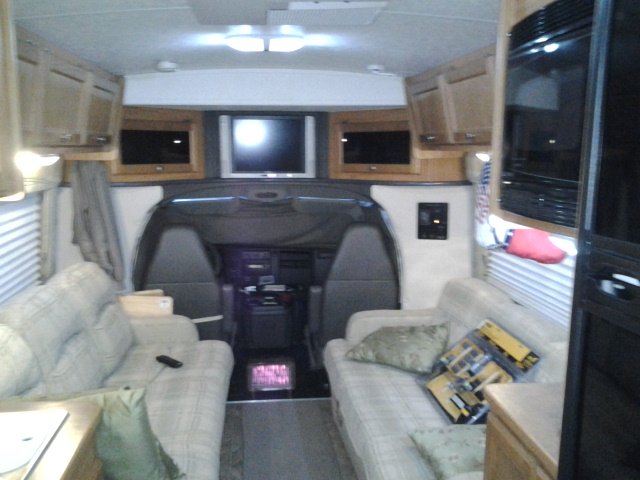
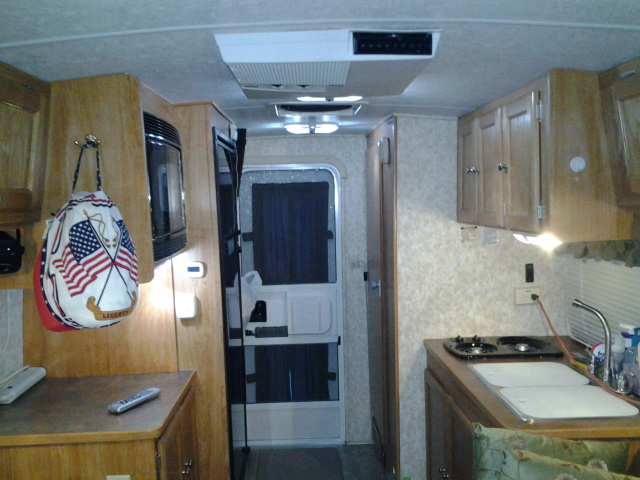
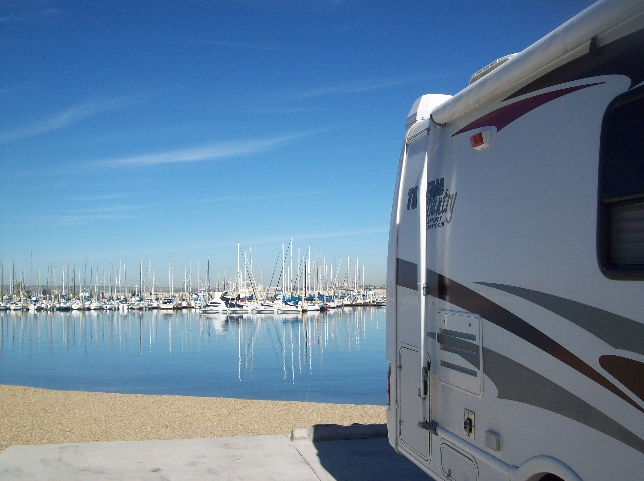
My RV:
Have most of the options. Both couches fold out to make a king sized bed. Have a microwave
instead of cupboard. Notice how bright the light fixtures are, those are LED lights, two
per fixture with each fixture using only .1 amps. Pics:
1
2
3
4
Things Learned:
12v Power:
RVs are designed to use 12v power from batteries to power propane sensor/alarm,
carbon monoxide/smoke detector, roof vent, batroom vent, water pump, lights,
refridgerator electronics, TV, radio, room slides, macerators, tank heaters and etc..
RVs also provide 12v power to 12v outlets/ports. My RV has five 12v power ports.
Three are powered by coach/RV battery and two by the engine battery.
Unless RV batteries are disconnected, the 12v powered devices will draw power 24/7,
this is called parasitic draw and can drain your batteries in a short time
In my RV this is a 4.3 amp/hr draw each day (two percent of 220 amp/hrs).
You can charge your laptop, tablets and phones from the coach/RV batteries. Better to
charge them from 12v ports powered by the engine while you are driving.
Most motorhomes are setup to charge your couch(house) RV battereis as you are driving
meaning the engine is connected to the RV batteries when the ignition switch is turned on
and off when the engine is off. My RV did not come set up this way. I added a battery
isolator in the engine compartment which connects the engine and RV (coach) batteries together
which allows my alternator to charge both. After driving for a couple of hours my RV battery
is fully recharged.
AC Power:
Most RVs have AC outlets (just like in your house) installed to provide AC power when
the RV is plugged into an AC outlet(shore power), the generator is running or an inverter
is used. Newest RVs have an AC inverter built-in (1000watt or larger), wired directly to
the battery. I use a small 150watt inverter to power the satellite antenna/receiver, WDTV
streaming media box, Roku Streaming box and WiFi router. Another 150watt inverter is used
to power a laptop as needed.
When powering your RV from an AC outlet (shore power), NEVER use a wimpy extension
cord, use a 12/10 guage (30 amp) cord. Do NOT run your air conditioner on a 15/20amp
household AC circuit, the risk is brown-out damage to your system. Remember the 80
percent rule, electrical circuits are designed to carry 80 percent continuous load.
Batteries:
Batteries are devices that store power/energy using a chemical process (lead plates
and sulfuric acid) and provide 12v power when the RV is NOT connected to an AC
outlet/generator.
Temperature effects battery performance and lifespan. Batteries kept in the
human temperature comfort range have a longer lifespan, charge faster and provide more
power. Cold batteries take much longer to charge and loose capacity. Never let
batteries freeze, it will kill them. To prevent freezing, keep battery charged and on
a charger/maintainer.
At higher temperatures (above 80F (27C)) battery capacity (less resistance)
generally increases, usually at the cost of battery life. Higher temperatures also increase the
self-discharge characteristic (storage). Colder temperatures (below 80F (27C)) lower battery capacity and
prolong battery life. Cooler temperatures will slow self-discharge. Therefore, operating batteries at
temperatures at or slightly below 80 F (27 C) will optimize both performance and life.
Battery capacity and temperature is basically a linear relationship. A good rule of
thumb is that for every 15F (9C) above 80F (27 C), capacity is increased by 10% and
for every 15F (9C) below 80F (27C), capacity is reduced by 10%. Batteries should not
be charged or operated in temperatures greater than 120F due to fire danger.
RV (coach/house) battery power usage is very demanding and only deep cycle
batteries should be used. Deep cycle batteries have thicker lead plates allowing them
to hold more power, hold their discharge voltage (12v) longer and go through the
cycles of charge/discharge without damage. A battery that has been deep cycled will
read 12.1v. Deep cycle batteries should not be discharged below 50 percent to
maintain lifespan. Deep cycle batteries are rated in the number hours they can
provide 20 amps and is referred to as amp/hrs. Some manufacturers call this reserve
capacity (RC). Bob Wells excellent Tutorial provides a very understandable anology of how battery
power works, read it.
Recommend a minimum of 220 amp/hrs for most RV applications which would provide
110 usable amp/hrs. If a battery has a CCA (cold cranking amps) rating it is NOT a
deep cycle battery regardless of the label on the battery. It seems that most RV
manufacturers/dealers use the cheapest (car) batteries so your first expense will
probably be to put in a real deep cycle battery.
IF you have room, most RV full-timers recommend using 6v Golf Cart (GC) batteries
instead of 12v as they have even thicker lead plates providing more capacity. Since
you need 12volts, you have to connect two 6v batteries in series to get 12volts.
Flooded cell (lead acid) batteries are the least expensive. A 220 amp/hr
6volt battery can be found for less than $100.00. A quality battery is about $120.00.
Takes two 6volt batteries connected in series to provide 12volts. Flooded cell
batteries require regular maintenance meaning battery cells need to be checked at
least once per month when in use, adding distilled water when cell fluid is below
cell chamber top and batteries need to be "equalized" regularly to remove sulfer from
cell plates to prolong battery life. Never add water to a battery that is not fully
charged.
Common Mistakes for Flooded Batteriers
Undercharging: Continually operating the battery in a partial state of charge, or
storing the battery in a discharged state results in the formation of lead sulfate
compounds on the plates. This condition is known as sulfation. Both of these conditions
reduce battery performance and will cause premature battery failure. Undercharging will
also cause stratification where battery acid concentrates in the lower half of a the
cell (bad).
Overcharging: Continuous charging causes accelerated corrosion of the positive
plates, excessive water consumption, and in some cases, damaging temperatures within a
lead acid battery. Did you know that a loose battery cable between two batteries can
cause just this to happen?
Under watering: In flooded batteries water is lost during the charging process. If
the electrolyte level drops below the tops of the plates, irreparable damage may occur.
Water levels should be checked and maintained routinely.
Over-watering: Excessive watering of a battery results in additional dilution of the
electrolyte, resulting in reduced battery performance. Additionally, watering the
battery before charging may result in electrolyte overflow and unnecessary additional
maintenance.
Absorbed Glass Mat (AGM) battiers are more expensive (about a thrid more of
flooded cell cost) but require no water maintenance. Regardless of claims, AGM's should be
vented same as Flooded cell batteries. AGM batteries have better charge/discharge
performance (charge faster, discharge faster) than flooded cell batteries but most AGM
deep cell batteries are actually marine type which means shorter lifespan and less
capacity. An exception are the new Trojan Reliant 6v AGM batteries which are true deep
cycle batteries. Make sure the charge controller can be set to AGM battery type to
properly maintain them or you will kill them quickly.
                      Battery Charge Chart
                          Flooded             AGM    LifePO4
          Charge    6v     12v      SG        12v      12v
          ==================================================
          ChgVolt                                      14.6v
           100%   6.37v   12.60v  1.265      13.00v    13.6v
            90%   6.31v   12.52v  1.249      12.75v    13.4v
            80%   6.25v   12.42v  1.233      12.50v    13.3v
            70%   6.19v   12.32v  1.218      12.30v    13.2v
            60%   6.12v   12.20v  1.204      12.15v    13.1v
            50%   6.05v   12.06v  1.190      12.05v    13.0v
            40%   5.98v   11.90v  1.176      11.95v    13.0v
            30%   5.91v   11.75v  1.162      11.81v    12.9v
            20%   5.83v   11.58v  1.148      11.66v    12.8v
            10%   5.75v   11.31v  1.134      11.51v    12.0v
             0%           10.50v             10.50v    10.0v
Battery Brands, there are many and just as many recommendations. Crown gets
highest marks for lifespan and customer service.
         Brand      Model        Volts    Capacity      Type     Cost     Warranty
         =========================================================================
         Crown      CR-220        6v      220 amp/hr    Flooded  $129.00   3 Years
         Crown      CRV-220       6v      220 amp/hr    AGM      $229.00   3 Years
         Crown      CR-215       12v      215 amp/hr    Flooded  $339.00   3 Years
         Crown      CRV-110      12v      110 amp/hr    AGM      $235.00   3 Years

         Duracell   GC125         6v      235 amp/hr    Flooded  $150.00   1 Year
         Duracell   GC2AGM        6v      190 amp/hr    AGM      $189.00   1 Year

         Exide                    6v                    Flooded

         Fullriver  DC-160-12    12v      160 amp/hr    AGM      $365.00   7 Years
         Fullriver  DC-210-12    12v      210 amp/hr    AGM      $485.00   7 Years

         Interstate GC2-XHD       6v      232 amp/hr    Flooded  $149.00

         Lifeline                 6v      220 amp/hr    AGM      $288.00   5 Years
         Lifeline                12v      220 amp/hr    AGM                5 Years

         LiTime                  12v      100 amp/hr    LifePO4  $329.00   5 Years
         LiTime                  12v      230 amp/hr    LifePO4  $620.00   5 Years

         Surrett    S550          6v      428 amp/hr    Flooded  $365.00   7 Years
         Surrett    S6-460        6v      415 amp/hr    AGM      $575.00   5 Years

         Trojan     T-105         6v      225 amp/hr    Flooded  $144.00
         Trojan     RT-105        6v      200 amp/hr    AGM      $242.00
Lithium Iron Phosphate batteries hold promise as they can be discharged to a lower
level and recharge significantly faster than flooded cell and AGM types. Today (2023) a 220amp/hr setup
costs around $700.00. If charging from engine alternator you may want to have a DC to DC charger to
protect the battery BMS from high current damage from your RV's alternator. Lithium batteries are damaged
when charged at temps below freezing. Note that Lithium batteries have a bad reputation of causing fires
due to being charged or discharged too fast. This problem does not seem to be true for Lithium IRON
Phosphate batteries used in RV applications. Lithium batteries are significantly lighter than flooded
or AGM batteries and can be oriented(mounted) sideways.
Batteries must be all of one type (Flooded, AGM, Lithium) and of the same amp/hr rating.
The weakest battery will drag the others down and ruin them so buy batteries as a set.
Battery Monitor
A device that tells you how much charge is left in your batteries, the current voltage, how many amps
are being taken out or are being put into the battery. Without a battery monitor you have no clue as to
what your power needs are or how healthy your batteries are. The best battery monitor, made by
Bogart Engineering, the
Trimetric keeps track
of what goes into and out of the batteries and is solar ready. Typical Trimetric setup will
run about $200 with shunt/wiring harness and is well worth the price. Bogart Engineering also makes
an excellent PWM charge controller.
With the Trimetric you can do a real-time energy audit.
         1. Disconnect from shore power.
         2. After a few minutes, record amps displayed on trimetric (phantom load).
         3. Turn on one 12v device. Wait a minute.
         4. Subtract phantom load value from trimetric reading and record.
         5. Turn off device and repeat steps 3 and 4 for each 12v device.
         6. To determine watts, multiply amps by 12 (Amps X Volts = Watts).
Here is what my RV audit showed:
                          Amps    Watts
                          -----   -----
         Phantom Loads     .180    2.16      (TV on circuit, propane detector, Parallax Converter)
             Bath Vent    1.240   14.88      (12v fan)
                Fridge     .530    6.36      (7CF Norcold in Propane Cooling mode)
               Furnace    5.980   71.76      (Furnace on and heating)
              Inverter     .200    2.40      (150 watt)
         Light Fixture     .050     .60      (2 LED Bulbs)
         Roof Vent Low     .180    2.16      (Maxx Air)
        Roof Vent High    2.950   35.40      (Maxx on highest setting)
             Satellite     .950   11.40      (Dish 211z Reciever, Tailgater 3 Antenna)
                    TV    2.880   34.56      (12v Jensen LCD)
                 WD TV     .720    8.64      (Player with Portable USB Harddrive)
                  WiFi     .350    4.20      (Engenius WiFi router)
            Water Pump    4.930   59.16      (Shurflow)
All items powered by the battery either directly or through the inverter. In my
RV, vent fans, lights, fridge, furnace, water pump and TV always run off the battery
whether the RV is plugged in to shore power or not.
Charge Controller
A charge controller is used to control how your battery is charged.
Most RV's have a factory installed charge controller, powered by AC (plugged in or generator) that is a 3
stage (bulk, absorption, finish) type. A modern 4 stage will not only charge and maintain your batteries
better, but should also have settings for different battery types (usually flooded, AGM and Gel). If you have
an older factory charge conroller you can upgrade to a 4 or 5 stage conroller with temperature compensation by
replacing the charger section.
A solar charge controller is designed to constantly monitor solar panel output, determine battery charge
state and adjust charging voltage/current for best deep cycle battery charge. NEVER connect a solar
panel directly to a battery.
Generators
Generators are loud (Honda/Yamaha not so much), run on expensive fuel and produce fumes
that can harm your health. When not used regularly, a generator needs to be exercised once a
month running for 30 minutes at half load or about 12.5amps (use air conditioner or electric heater)
Change oil regularly to keep generator running smoothly.
Generators are good at bulk charging batteries but waste a tremendous amount of fuel
when finish charging last 20% which can take several hours if not a day or so of
continuous charging. AC heating and cooling devices such as Air Conditioner,
Microwave, Induction Stove Top, Electric Heater typically use about 1500 watts which is
about 12.5amps AC or 125amps DC which means a generator is the most practical way to
power these devices, unless you have lots money to spend on a very very large battery
bank. Modern generators are very quiet so the noise problem has been reduced somewhat
but is still there with Honda and Yamaha brands using very little fuel. A built-in
generator run overnite would probably use about 8 gallons of gasoline (have done so
when stuck overnite in blizzards and darned glad to have a generator to power
electric heaters when furnace quit working).
When using a generator to recharge your battieries, run it for about one hour to bulk charge batteries
and then let them rest for an hour before resuming charging.
When starting your generator in cold weather, use the pre-heat to warm/circulate oil before engaging
generator starter, it will help lubircate generator engine and improve its lifespan.
Note that Cummins/Onan generators have a small circuit breaker, usually just to the right of the
start switch on the generator. This circuit breaker will trip if demand on the generator exceeds its
capacity (30/50 amp). When the circuit breaker is open pull the switch towards you to reset the breaker.
There are two type of generators:
1. Alternator type; onan, generac, etc. (69 - 79 decibels) run at full speed all the time to generate
120AC regardless of electrical load. This is the type commonly found in motorhomes.
Note that Onan is now owned by Cummins.
2. Inverter type; honda, yamahah (51 - 61 decibels) run at lowest speed possible to produce DC which
is then inverted to AC.
             Watts    Max Amp    70% Rule (what you really get)
               1k       8.3        5.8
               2k      16.6       11.6
               3k      25.0       17.5
               4k      33.3       23.3
               5k      41.6       29.1
               6k      50.0       35.0
               7k      58.3       40.8
               8k      66.6       46.6
               9k      75.0       52.5
              10k      83.3       83.3
Lastly, all combustion engines loose efficiency as altitude increses.
Solar Panels
Solar systems, panels and associated charge controller, are much better at charging and maintaining
deep cycle batteries (as a rule) than the factory installed charge controller connected to AC or
powered by a generator assuming the solar system is properly sized and installed (a complicated subject)
as there is no noise, no fuel, no fumes and no maintenace other than wiping down the glass to remove dirt.
As to the cost, how many times would you not stay in an RV park if your batteries were fully charged
each day? If an RV park costs $35 a day and a solar system costs $842 (2 150 watt panels ($400 - Renogy),
SC3020 charge controller ($129), T2 Temperature Sensor ($13), Trimetric Battery Monitor with shunt and
wiring harness ($200), Misc parts and shipping ($100)) it would take less than 25 RV park days to pay
for the solar system. This is just an example. Costs can be more or less.
Solar power makes boondocking/dry camping practical.
RV (12v) rated solar panels should produce 19-22v Voltage open circuit (Voc) and can be used with the
more cost effective Pulse Width Modulation(PWM) charge controller ($120 - Trimetric). Higher voltage solar
panels (38-44 Voc), so called grid panels, require use of a Mulitple Power Point Tracking(MPPT)
controller ($240). Grid panels are cheaper per watt compared to RV panels but MPPT controller is more
expensive. Do not buy a cheap charge controller.
As with batteries and tires, solar panels should be sized the same and perform best
when wired in parallel. At a minimum, figure 1 watt per battery amp/hr. A 220amp/hr
battery system paried with a 300watt solar panel system should work well for the full
timer.
Always buy a little larger than you need as solar panels rarely produce rated
amount of power.
Solar panels produce less power because:
     1. Shading from clouds, trees, vent covers, dirt, watermarks, etc..
     2. High temperatures.  Inverse ratio; higher solar cell temperature, less power produced.
     3. Angle to the sun.
     4. Another underperforming solar panel when connected in series.  Always connect panels in parallel.
Flat panel technology is NOT ready for RV usage as rarely do the panels last longer than
five years, panels take up quite a bit more space when compared to traditional glass
panels and since they are typically glued to the RV roof, have severe performance issues due to heat.
Shame as Flat panels can be glued to the roof and weigh considerably less.
Don't skimp and buy a cheap solar charge controller. Trimetric, Victron and Morning Star are the best. Make
sure the charge controller can be set to your battery type (Flooded/AGM/Lithium).
If you do not want to mount solar panels on your roof, there are various "suitcase"
kits that you can connect to your batteries. I made my own solar suitecase.
Bought two 100watt 12v solar panels from NEWPOWA for $140.00. Added two hinges to create
a solar suitcase and legs to hold it up. NEWPOWA 15amp MPPT charge controller is mounted next to battery. Panels
are connected to RV using ordinary electrical plugs. Panels are used when boondocking. Charges battery
to 100% in less than 4 hours. If I have too many non-sun days can recharge using generator or turn on
engine. Total cost to build the solar suitcase with two 100watt panels ($140.00), external MPPT controller ($59.00),
mc4 wire extension ($39.00), parallel mc4 connector ($19.00), misc hardware/plugs ($8.00) was $265.00
Inverter
An inverter changes 12vdc to 120vac. A small inverter (150 watts) can be used to
power a satellite receiver, streaming media box, portable USB hard drive all at once or
can power 90 watt powered laptop. If you need more AC power for your device, you must
install a larger inverter with a direct connection to the batteries as a 12v power port
will not provide more than 200 watts of power (about 20 amps) to the inverter.
Converter
Changes 120vac to 12vdc.
Off-Road:
Non-paved roads and 4 Wheeling do-able with a small RV (22Ft Max). Go Slow,
washboard roads can rattle your cabinets right off the wall. If trail is deeply
rutted, high side the side that houses the generator exhust and dump connector. Do
NOT attempt to take a bus type class A on a rutted trail, you can tear the basment doors
and compartments off.
Dash AC/Heater:
Heats and cools entire coach which works great while driving. Doesn't take long
for the cool or warm air to go the other way when stopped but having warmed or cooled
the coach means it takes less energy for the 12v/propane systems to maintain that
temperature. Turn off dash heating/cooling system and close dash vents when done
traveling to reduce hot/cold air drafts through them. Note that the refridgerator
vents (top and side) can let a large amount of cold air into your RV.
Bed:
When solo camping, prefer to sleep on one couch, roll out sleeping bag. When
grandkids are with us we fold both couches down to make a king sized bed, put a
sheet on the bed, add pillows/slips (regular sized for adults, Walmart craft
pillows for each child) and sleeping bags.
When stowing sleeping gear, roll sleeping bags tight as possible, stuff in cinch
sacks. Place pillows in kitchen trash bags (32gal works well), sit on each to
squeese out air, twist and knot top of bag closed. Compressed pillows take up a lot
less space. We are able to get five sleeping bags, five pillows, two king sized bottom
sheets, and four blankets into the cupboard above the driver's side couch.
In summer, a battery powered fan usually suffices to make sleeping pleasant, at
least until the temperature is above 80F. Walmart sells USB powered fans.
In winter, wrap blankets aroound sleeping bag foot with a couple on top. A twin
sized foam pad (doubled over) on couch dramitcally increases comfort ($24 at walmart in
blanket section). The pad can be rolled pretty tight for storage (use straps - walmart
camping section - to keep tightly rolled). Place blanket edges under foam pad to keep
blankets from uncovering you during the night. Another trick is to use two sleeping bags,
one inside another.
Television:
Modern 12v LCD televisions are worth having as they do not require an inverter. I
have a Jensen 20 inch, 12v LCD TV that works great, uses 3amps vdc. Newer simular
sized TVs use much less power but this one fits and still works great. Grandkids love
watching cartoons as we go down the road.
Projector:
Projectors have gotten brighter, smaller, higher resolusion and cheaper. If you have a WD TV
Player/laptop you can connect it to the projector and play movies/videos off your USB drive. I project
mine on the side of my RV. Gandkids love it. Popcorn night!
WD TV Player:
This is a media streaming box, about the size of portable USB hard drive that plays
video files (in various formats), from internet streaming servics such as netflix and
music (mp3) files. Files can be on a portable USB hard drive or flash drive. Comes with
an AC adaptor but will run plugged into 12v power port (have to get your own adaptor -
power plug on back of WD box is size O as in oh - be sure get the polarity right on the
plug the first time, you will not get a second chance).
WD box is connected to a WiFi router allowing the grandkids to each watch something
different should they wish to do so on their tablets with headphones (yea). Now days
you can put your DVD/CDs on a USB Flash memory stick and save on physical storage space
(ask high school kids).
Roku Streaming box connected to WiFi router which is connected to phone hotspot. Provides
access to YouTube, BritBox, Prime, Paramount+, Disney+, Roku channels, Pluto channels, BYUTV and
more.
Internet Have UNLIMITED internet for streaming TV shows, laptop, etc.. Internet is provided
by a cell phone hotspot tied to a USB powered Travel router. This service is absolutely unlimited
and never slows down at a cost of $25.00 per month. www.visible.com
TV Antenna:
Wind bent the Winegard batwing TV antenna into uselessness. Replaced it with a King
Controls Jack digital head which works pretty well but I do not watch air TV very much
any more. Finally removed the attenna.
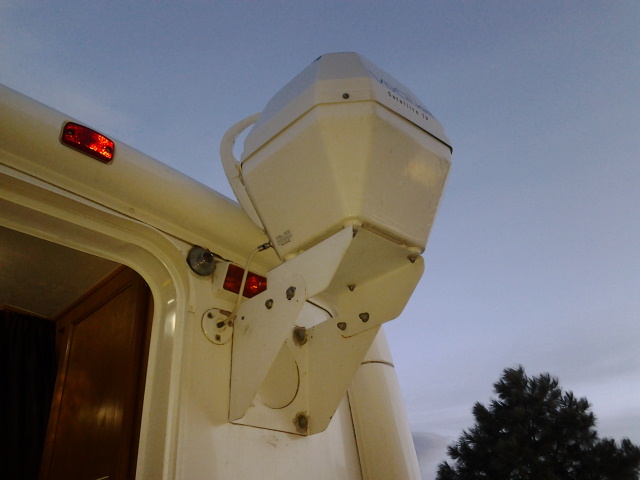
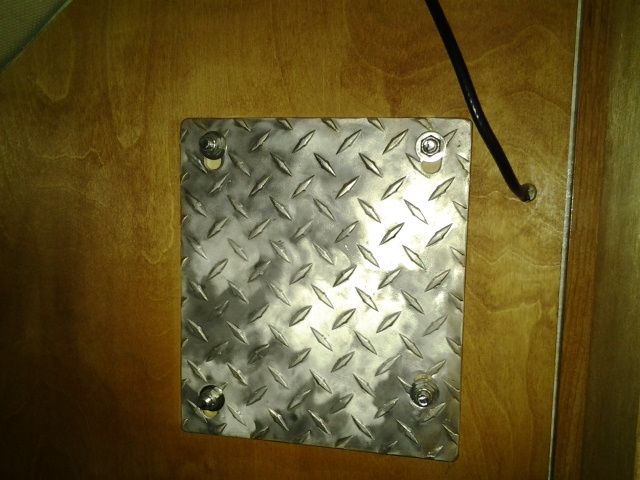
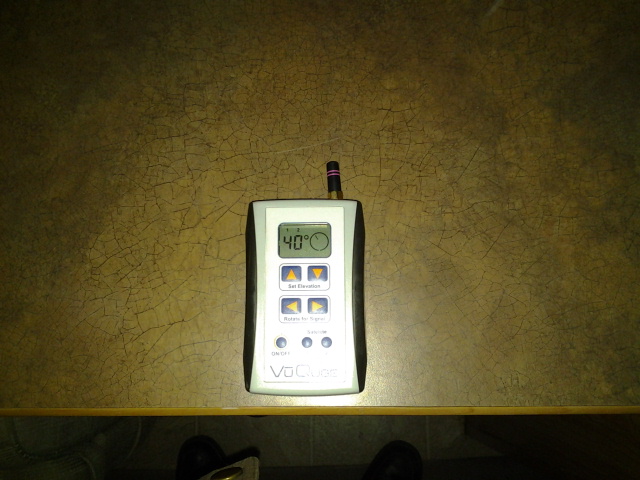
Satellite:
Rewired TV cabling to allow RV park cable and satellite feeds. Reinforced rear
closet wall with 1/2 inch stained birch plywood and aluminum diamond plate panel for
support of bracket and VuQube 1000 satellite (now a Dish Tailgater 3) antenna on rear of
motorhome.
Pics: 1
2
3
4
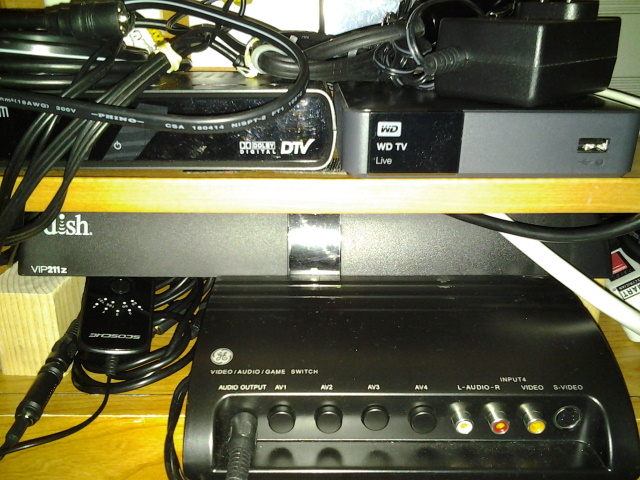
Replaced Dish network 311 receiver with a 211z and now with a Wally. The 211z is not as easy to use for
pointing the satellite antenna as the 311 but the 211z has HD capability and produces a
great picture. 211z also does not have a coax connection for the TV, just RCA and HDMI
which is no problem with my setup. The Wally is smaller, is very light, has RCA and HDMI connectors.
Do not like loosing network televison channels when outside home area (150 mile
circle). Calling Dish to change service area has never worked for me plus anyone at
home looses the so called local channels (no channel is a local channel at my home base).
Better method would be to enter zip code into reciever and determine which spot beam to
use. I would be happier with a set of national network channels but since money
is involved, Dish will never be allowed to provide such. Sucks for the consumer.
TV Sound:
Sometimes just can't hear the TV (getting old) and don't want to turn up volume
as do not want to share the TV with world. Have a small FM stereo tranmitter, Sorsche (Walmart $9.00), attached to
video switch. Works pretty well, good enough to keep the grandkids happy when going
down the road as can play TV on dash stereo. However when the movie gets really
busy/loud, sound through headphones or radio sounds pretty staticy, a limitation on
sound bandwidth.
Solution: use computer speakers just behind head (think
about it). Bought a battery (2 AA) powered computer speaker set from Walmart ($9.95)
which has a headphone jack. Ran headphone wires from video switch to each couch
through wire raceway on each side of the RV. Can now use headphones or connect
to/through powered speakers. When using headphones/speakers the sound is NOT stacticy
when sound is busy proving once again that wires are better than wireless :) Added a
Bluetooth/3.5inch Stereo speaker ($20.00 at dollar store) which works with TV and Phone.
Video:
Added a GE composite video switch (Walmart - $9.95) to allow multiple video inputs
into single TV input and as a bonus provides sound output.
Dinnet/Tables:
RV came with two poles and table tops that go between couches but prefer using light
wooden TV tray tables (Walmart $10 each) as they are much easier to setup/store.
Tables work great to feed five, hold laptops and become craft tables as needed.
Plumbing:
Water pump is at times very loud. Have put in loops, accumulator, insulating foam
to no avail. The hammering noise is due to the pump cycling. You would think that in the
21st century that technology would be perfected, sadly not.
Winterize plumbing pumping the system dry as possible, add antifreeze in through
gravity fill port and pump through system until you see the pink stuff come out of
faucets and into toilet. Pump a little into water heater then turn the bypass valves to
prevent all the anti-freeze from going into the water heater. Can use antifreeze to
flush toilet in subzero temps (I dry camp a lot in the winter and it is often below
zero degrees F). Beware of cheap RV antifreeze. Always firgured it didn't make a
difference. It does. One day went to pour a little down the shower drain and it came
out as slush. Obiviously the antifreeze didn't work (was only 10 degrees out).
Always use a water filter when putting water in your fresh tank or city water port.
Water filters are cheap compared to stinky/sandy water problems. Always use a water
pressure regulator at the water spigot when connecting to city water.
Proper order of water connection should be Spigot, Pressure Regulator, Water Filter,
Drinking Water Quality Hose, RV water Inlet.
Diluted bleach can be used to sanitize the water (through gravity port) and gray
tanks. Thoroughly flush the plumbing before using it to shower as bleach can terribly
irritate your skin.
Strongly recommend using bottled water for drinking and cooking instead of your
water tank. Use the tank water for flushing, showers and cleaning.
Ptraps dry out in warm weather and while you are driving. Pour water down the
drain to keep the tank gasses (smells) out of the coach. Better yet, replace ptraps
with a Hepvo valve and you will never have tank smells in the RV again. Some RV
bathroom sinks (small RVs) drain into the black tank, keep drain stoppered to prevent
black tank smells from entering coach.
Most RV plumbing roof vents will push smells from the gray and black tanks into the
coach as you drive or when wind is strong. The 360 Siphon not only prevents your tanks from being over pressured (thus
pushing tank gases into the coach) by outside air as you drive down the road but
catches the smallest breeze when parked to suck fumes out of the tanks, it really
works.
Toilet:
Do NOT put stuff like wipes, diapers, pads into
toilet as it may stay in your black tank forever. If the worst happens and the toilet
throat is clogged (happend on a boy scout outing in subzero temps and not enough water in bowl
prior to flush), use a cheap wooden cooking spoon to dislodge the stuff. Do not let
the spoon fall into the tank. When done with spoon, wrap in plastic bag and
dispose.
Hygene:
RV shower does the job, water heater only needs a few minutes to warm water not an
hour. With the water warm, you don't need to mix shower water (reducing waste). Wipe
shower down with towel after use to prevent soap build-up. When hooked up at RV park,
keep gray and black tanks closed to keep out sewer flies and other vermin. Tanks
should be full when dumping to ensure a good gravity dump. Thoroughly flush black tank
when dumping to prevent paper/crud build-up.
After winterizing, put extra RV anti-freeze into water tank to use when flushing the
toilet (no frozen black tank). Keep bottle of water at sink for washing hands (dont
like sanitizer) as well as anti-bacterial wipes.
Dry Camp Shower - warm water on stove, about 1/3 gallon or so then:
For hair, partially fill a 16oz cup with warmed water and while leaning over sink, invert cup
over hair pressing lightly against hair moving from back to front to wet hair, use a
few drops of shampoo, then rinse same as you wet hair. I keep my hair short so this
works quite well for me.
For body, use antibacterial wipes on arm pits, feet and private areas, and using a
small bowl of water from pot, rinse with wet wash cloth. Using lightly soaped (a few
drops) water from pot in bowl, clean rest of body, then go over with rinsed wet wash
cloth to remove soap (don't forget your back). It works though not as enjoyable as a
full hot shower. Any remaining water can be used for shaving or collected for flushing.
In winter pour a little anti-freeze down drains to keep traps and gray tank from
freezing.
Hot/Cold:
Parking in the shade greatly reduces interrior temperatures in summer.
Summer: use relfective sun screen between windshield and curtain as it really
reduces inside temps. Small 12v or battery powered fans improve sleeping comfort when
temperatures are moderate.
Winter: use plastic window cover film on windows and screen door which will help
reduce cold air drafts and allow light in. Use large blanket to create air damm
between cab (class b/c) and rest of RV as automotive doors let in a lot of cold air.
Don't forget microwave, ceiling vent and that huge refridgerator vent on the side of your RV.
IF you are not running your refidgerator you can put plasic or insulation on the inside of
the access door on the side of the RV (do NOT cover that door if your fridge is turned on).
Close dash vents to help reduce drafts.
Forced air furnace will heat RV faster than electric heater. Some use propane
heaters (Buddy etc.) but remember you must have some air comming in from the cold
outside or it could sufficate you. Propane heaters produce moisture so you may wake up
to frost/ice on inside of windows. Turn heat down when sleeping to save energy. Be
carefull with electric and propane heaters, they can easily start a fire should
bedding/furniture/carpet get too hot.
Refridgerator:
RV fridges are pretty lousy, being terribly under-powered cooling wise. In moderate
temperatures (less than 75 degrees F) an RV fridge will work reasonably well but never
expect it to keep drinks ice cold. Temperatures above 75 will make it struggle. If you
have a large RV with tons of Batteries and a large inverter you can use a house type
compressor type fridge but small RVs are stuck with the absorption type with fire (very
real risk) and spoiled food risks. Hard to believe Dometic and Norcold can not engineer
a safer/better product than the system invented in 1858(greatly refined in 1926, Einstein-Szilard).
There are RV fridges with Engle/Foss compressor cooling systems which use about 60amps per day.
I have yet to meet anyone that likes their absorption fridge.
Keep fridge side of RV in shade (at an angle facing away from sun in parking lots,
awning, trees) to help keep it cooling. One hour of direct sunlight in the summer is
enough to raise fridge temperature by 10 to 20 degrees which will take the fridge 10
hours to cool down from. Keep a thermometer in the freezer and fridge. Use a battery
powered fridge fan to circulate the cool air. If you can, put a 12v/solar powered fan
at the top of the fridge vent to help move heat generated by the coolant coil heater out
of the back of the fridge. Keeping interior of RV cool in summer will help the fridge
a lot.
Start-up fridge at least 24 hours (longer if hot) before use. Pre-freeze frozen and
pre-cool cold items before putting in fridge especially water/soda. Warm and hot items will
increase fridge temperature in minutes taking the fridge hours to cool down again.
Keep RV level when using fridge as when it is not level, cumulative damage occurs
reducing fridge lifespan and increasing fire risk.
Generally, I keep cheese/other dairy in the lowest part of fridge and use the rest for water and
soda. Remember to pre-cool water and soda.
Dry ice in a cooler can be used to pre-cool/freeze items when purchasing on the
road. Dry ice can usually be found in a store meat deparment. Do not handle dry ice
directly as it will freeze instantly to your skin. Dry ice is not recommended in the
fridge. Dry ice produces carbon dioxide which can sufficate you, be careful.
Door of freezer/fridge will be warmer than back of fridge/freezer. On hot summer
days items in the door will be much warmer. Fridge door seals do wear and leak over
time. Keep the seals clean and check for leaks if having problems keeping an empty
fridge cool.
Use frozen blue ice bricks to improve cooling in the fridge. Freeze them over night in
the freezer, put a couple in the fridge in the morning. In the winter, put blue ice bricks
outside RV in bag to freeze over night, put into fridge in morning which keeps stuff cool enough
without using electric/propane. A warning about the ice packs that come with some medical deliveries.
They can work just as well as the blue ice bricks. However, they leak when thawed and leave a sticky
film on you and your stuff. Putting them in a zip lock bag or a seal-a-meal bag eliminates that
problem.
Ice on cooling fins in fridge will prevent cooling and could trigger (depending on
brand) a defrost cycle to melt the ice and ruin your food. Keep doors closed. Use
damp-rid to reduce humidity in the fridge. Once ice forms on the fins you have to defrost it
or it will not keep food cold. If the fridge stops cooling, sometimes you just have to turn it
off for 30 minutes or so to let it reset.
When not using fridge, keep doors open to prevent moldy smell from developing.
Keep small/light hammer around to break-up ice cubes kept in freezer, don't pound ice bag
on counter/floor or with your hands :)
Lights:
LED light bulbs use much less power than incandecent/halogen/flourescent bulbs.
Replaced all (16) coach light bulbs (#921) with LED bulbs. Old bulbs used 1.5 amps
each (two per fixture) producing lots of heat. New LED bulbs use .050 amps each with no
heat. All light fixtures can be turned on and not use the power of 1 old incandecent
921 bulb. LED bulbs were a direct replacement for incandecent bulbs. LED bulbs are at
at some Walmarts and internet. LED bulbs produce light at various frequencies, higher
number is whiter, lower is yellower. When replacing outside marker lights with LED's
make sure bulb will fit and produce at least the same number of lumens as
incandecent bulb.
Replacing turn signal and brake incandencant bulbls with LED bulbs can cause problems,
consult your dealer first. Replacing the backup bulbs with brigher LED bulbs is a win-win.
LED flashlights are cheap and use very little battery power. Keep one around for
outside night work/emergencies.
Radio:
Replaced Jensen in-dash radio with a Kenwood touch screen with USB mp3 ability.
Sounds Great and I can have my entire music and old-time radio play collection at
my finger tips.
Kitchen Sink Drain:
Replaced p-trap under kitchen sink, emilinating 50% of the
piping, with drainmaster HepvO valve. Before After.
Gained a ton of stroage space. No smells from the gray tank. Reinforced undersink shelf with 1/4
plywood.
Linens:
Built shelves in closet to hold
towels and wash rags.
External Storage Area:
Added ridged insultation in compartment to eliminate entryway for bugs in summer and
prevent cold air from entering coach.
Shoes:
Use small, rough kitchen rug at bottom of steps to wipe shoes off to help keep coach
clean. Keep slippers or flip-flops next to door and take shoes off at door.
Coach Battery:
Replaced single battery tray with tray that can hold three batteries. Replaced
wimpy 12v battery with two 220amp hour 6v batteries. Changed out 6v batteries with a
12v 199amp hour 4D AGM battery. Moved battery into coach placing it at end of couch
and made a wood box to cover and protect it. Now it is not subject to road heat/cold.
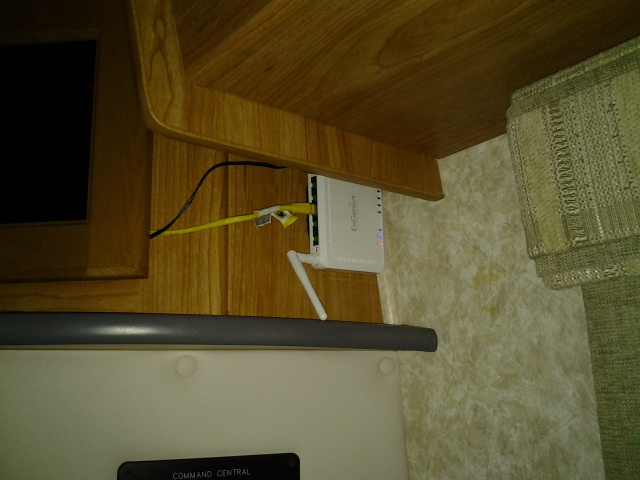
WiFi:
Use an Engenius WiFi router, very small, low power, 802.11
b/g compatible and it can run directly on 12v. Just changed router to a Cradlepont
Point CTR-35 router as it can automatically (once setup - WiFi as WAN) connect to the
Verizon Jetpack for internet. This way those using the WD player via WiFi can watch
videos and use internet by signing onto the router only. This router pushes video at
75ft with no problem.
Now using a GL.iNet Slate GL-AR750S Travel router Link
connected to my phone's hotspot(Visible unlimited Talk/Data/Text AND Hotspot for $25.00 per month using
Verizon cell network. Kids can watch Roku channels while traveling.
Another benefit of a WiFi router in the RV is that grandkids can play multi-player
DOS games on laptops(sweet).
Wanted to add external WiFi antenna such as WiFi Ranger etc. for connected to WiFi
when available. However, after thinking about it decided that using an omidirectional
antenna was a bad idea as it would interfere with my neighbors, would not have very
good range and requires the solution to be travel/waterproof and with limited roof
space difficult to do.
Have a directional anttenna, pointing the anttenna at the WiFi signal source at
RV park, house, Starbucks, McDonald's, etc.. Selected the Ubiquiti Nanostation Loco M2.
Mounted antenna on a wooden paper towel holder which allows placement anywhere in the
coach or outside through window or door. Antenna is powered via POE (power over
ethernet) adaptor which is located in the video cabinet. Two cat5 (ethenet) cables
are used, both connected to the POE; one between the antenna and one to the router.
Can have WiFi anywhere I can lock the Nanostation onto a signal and can use laptop,
tablets and phones without having to login to the WiFi at the park with each device.
Ubiquiti is easy to setup and use.
If a password is required, just enter it on the Ubiquiti signal lock screen. If a
login web page displays, login as directed. Not as eligant as having an antenna on the
roof but is easy to setup, works well, uses very little power and is portable. Worked
well when there was WiFi to connect to which means most of the time where I camped it
did not work. Also, this antenna is VERY picky about its power meaning it will not
work with a non-sine wave inverter.
Internet:
Used, Verizon prepaid Jetpack from Walmart. Works very well, does not cost
very much and ends the how am I going to get on the internet securely question when I
need to pay bills, research the next travel route and get tourist info. It works with
phones, tablets and laptops. It appears that you can be up to 75ft from the device and
still have a fast connection (4G). One caution though, watching netflix works but will
sure eat up all the Gbytes fast. I have my cradleponit WiFi router setup to connect to
the jetpack automatically so I only have to be connected to the WiFi router with any
device to use the internet. Turn it on, use the internet, turn it off when done. No
fiddling with the WiFi router to make it work.
Use my phone's hotspot for internet. Have a Straight Talk plan and a $49.00
Samsung phone. For less than $60.00 the plan provides 60GB data internet at LTE speeds, unlimited talk/text and 10G hotspot
data. Works great. Connect phone to LTE data or a nearby WiFi, turn on phone hotspot,
connect laptop, tablet, tv to phone. Can watch Netflix and Youtube with no interruptions.
Phone also has ability to share WiFi connection which means I can use free WiFi to stream
unlimited amounts of Netflix through the hotspot without using up LTE data. It seems modern cell phones can
connect and use very weak WiFi signals that routers could not use. Changed from Straight Talk to Visible to do same thing for
$25.00 per month plus hotspot is UNLIMITED.
Wishes:
AC: Replace air conditioner with unit having much lower profile.
Cameras: Dash, backup and right side cameras. Motor home fits into a standard parking stall. Unfortunately backing out of stall is risky given the way people drive in parking lots. Like the rear view mirror type. Wish I had a camera that could take pictures while I drive that sees what I see.
Coach Steps: Replace step arrangement with an arraingment like some of the truck campers I have seen.
Curtain: Replace Cab curtain with better setup with at least some insulating value.
Heater: Replace forced air heater with catalytic type. While current heater does the job, it is loud, uses a lot of 12v power and uses a lot of propane.
Lights: Replace all external lights with LED lights. Love that look.
Outdoor Room: Have an outdoor room made that will go from coach rear door and around awning.
Refridgerator: Figure out how to make it run better. Not a fan of the current absorption systems. Norcold box is really wimpy when outside temps are above 70.
Sink/Stove: Replace double kitchen sinks with a single sink and rotate stove 90 degrees.
Vacuum: Add vacuum system or more likely, find a very long hose extension for the small shopvac so I don't just move the dust around.
Water Pump: Replace with one that absolutely does not make any noise.
|
