This version of PowerBASIC offers an excellent graphics package for most any programming need. It's fast. It's complete. And it handles all those messy Windows details for you... automatically!
First, it's good to know that graphics in PowerBASIC are persistent. Create it once... and forget it. You'll never worry about redrawing when your window is minimized or temporarily covered. PowerBASIC handles everything. Automatically!
So, how about a quick overview? Just what can you do? First, how about some fancy text? Any font. Any size. Any color. Bold. Italic. Underline and Strikeout. Mix any combination of fonts on a single Window. Print just about anything, just about anywhere. Then add bitmaps. Stretch them or condense them. Copy them or change them. Circles, ovals, lines and boxes. Fat lines, skinny lines, ellipses, rounded rectangles. Filled forms or empty. Colors or not. You'll create a custom scaling system -- even with fractional floating point coordinates!
So, let's get started. You should know that almost
every graphical function name starts with the word
Step one -- you'll need a canvas. A place to create these works of art. So, create a GRAPHIC WINDOW. Or two. Or ten. They'll be visible right away and give you quick feedback.
GRAPHIC WINDOW "PowerGraphics", 600, 200, 400, 300 TO hWin???
You'll get a new window, with the title "PowerGraphics". It's positioned on the upper right side of the screen at x=600, y=200. It's 400 pixels wide, and 300 pixels high.
A second option is a memory bitmap. These aren't visible at all. You create your image "behind-the-scenes", then copy or stretch it to a visible window whenever you're ready. Use GRAPHIC BITMAP NEW for a blank bitmap, or GRAPHIC BITMAP LOAD to get one from a resource or a disk file. You can have one window or five. One bitmap or twenty. As each is created, it returns a handle that you need to save. That's how you'll identify each of your canvases.
|
Step two |
Use GRAPHIC ATTACH to choose a "graphic target". This tells PowerBASIC which window or memory bitmap to use, for the actions which follow. Until you execute another GRAPHIC ATTACH to change it again. Move back and forth, as often as necessary. There is no limitation here. |
|
Step three |
Draw-Draw-Draw. Arcs. Circles. Lines. Boxes. Text. Display them. Copy them. Save them to disk. |
|
Step four |
Clean up when you're done. You must close every graphic window with GRAPHIC WINDOW END, and every memory bitmap with GRAPHIC BITMAP END. |
It's just that simple!
Some GRAPHIC functions use the concept of an implied "graphic position" to determine the default point on the graphic target where the next operation will take place. In PowerBASIC, we use the keyword POS to refer to this position (See GRAPHIC GET POS and GRAPHIC SET POS to alter or retrieve this position). POS is also commonly known as the LPR (Last Point Referenced) or even NPR (Next Point Referenced). For most purposes, you can consider these three terms to be synonymous.
When a Graphic Window or Graphic Bitmap is created, the default POS is set to (0,0), which is the upper left corner. Unless you specify otherwise, the first graphical operation starts at that point, and the completion point is then saved as the new POS. So, if you draw a line from (0,0) to (100,100), that last point (100,100) is saved as the new POS. The next line you draw would then, by default, start at (100,100), and then automatically save its completion point as the updated POS for next time.
The "Graphic Position" (POS) is used by GRAPHIC LINE, GRAPHIC PAINT, GRAPHIC PRINT, and GRAPHIC SET PIXEL. Other graphic functions neither use nor update POS.
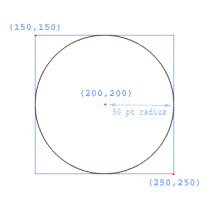
Other GRAPHIC functions, namely those involved with the drawing of curves (GRAPHIC ARC, GRAPHIC ELLIPSE, and GRAPHIC PIE), utilize the concept of a "bounding rectangle" to determine their size and position on the graphic target. A bounding rectangle is defined as the smallest rectangle which can be drawn around the circle or ellipse. For example, let's say you wish to draw a circle centered at position (200,200), which has a radius of 50 pixels. The upper left corner (x1,y1) of the bounding rectangle would be at (150,150), while the lower right corner of the bounding rectangle would be at (250,250).

See Also