| BootDisks |
These images have been archived using Disk Copy Pro 2.6 (DCP) IMG format, which is a DOS based utility which can also be extracted by WinImage. Each image is saved in 3 1/2" 1.44MB HD Format, But can be easily be converted into 360Kb 5 1/4" LD, 1.2Mb 5 1/4" HD and 3 1/2" 720Kb LD Formats by both DCP and WinImage.
Read Convert.Txt in each Zip Package which contains Boot Image & Instructions
Bootdisks for versions of MS PC & DR DOS and DOS based Bootdisks for Windows up to and including ME are listed here.
Please Note ~ You need to Download DCP or WinImage Separately:
Disk Image Pro v2.6 DisketteImage Creation and Extraction Utility for DOS
Note ~ This version of Disk Image Pro does not supportNon-Standard diskette sizes such as Microsoft 1.68MB DMF, But itis ideally suited for Bootdisk creation with its diskette sizeconversion capability. (Program Only - No Help File)
Disk Copy Fast v5.3 Diskette Creation Utility for DOS ~ SharewareEdition
Disk Conversion is disabled in this shareware copy, But it isable to read and write 1.68MB DMF Format. (Complete with Helpfiles and Notes) and re-create all the following DOS images in1.44MB 3½" HD Format Only.
WinImage v3.0 16bit versionfor Windows 3.1x
Microsoft Win32s v1.30 ~ 32bit support for Windows 3.x
WinImage v8.0 32bit version for Windows 9x, NT (x86), 2000 & XP(Link to WinImage Download page)
WinImage HomePage is at http://www.winimage.com
Basic DOS UnZip Utility - UNZIP.EXE
All Bootdisk Images are now categorised as follows:
![]() Disk Imagesaved by Disk Image Pro for DOS as .IMG file (Needs Disk ImagePro for DOS or WinImage for Windows to extract to Floppy)
Disk Imagesaved by Disk Image Pro for DOS as .IMG file (Needs Disk ImagePro for DOS or WinImage for Windows to extract to Floppy)
![]() BasicIMG Bootdisks are further compressed into ZIP format archive files(Download basic UnZip Utility oruse PKZIP or WinZip to open)
BasicIMG Bootdisks are further compressed into ZIP format archive files(Download basic UnZip Utility oruse PKZIP or WinZip to open)
![]() Disk Imagesaved as Disk eXpress Self-Extracting Diskette Image for DOS
Disk Imagesaved as Disk eXpress Self-Extracting Diskette Image for DOS
![]() Disk Imagesaved as a Compressed WinImage IMZ File (Can only be opened byWinImage for Windows)
Disk Imagesaved as a Compressed WinImage IMZ File (Can only be opened byWinImage for Windows)
![]() SelfExtracting WinImage .EXE File (Needs to be extracted underWindows 95 or higher)
SelfExtracting WinImage .EXE File (Needs to be extracted underWindows 95 or higher)
(Canbe extracted under Windows 3.1x if Win32sv1.30 32bit support is installed first)
![]() Other Image File Types and Locations.
Other Image File Types and Locations.
Each Boot Disk contains the following ~ IO.SYS, MSDOS.SYS, COMMAND.COM, FDISK.EXE, FORMAT.COM and SYS.COM
(Note - IBM PC-DOS, DR-DOS & NovellDOS contain IBMBIO.SYS & IBMDOS.SYS in place of IO.SYS & MSDOS.SYS)
You are advised to create a Bootdisk from your own Working Computer. The following images are provided as Emergency Bootdisks (EBD) Only. Microsofts Copyrights and Limitations on use still apply.
Please Note - The earlier MS-DOS 6.22 Emergency Boot Disk (EBD) has now been Withdrawn from use.
![]() UNZIP UTILITY All the following Bootdisk Image files are further stored in ZIP files for Download & Storage:
UNZIP UTILITY All the following Bootdisk Image files are further stored in ZIP files for Download & Storage:
 MS-DOS BootDisk Images
![]()
![]() MS-DOS 2.11 Bootdisk ~
MS-DOS 2.11 Bootdisk ~
![]() MS-DOS 3.21 Bootdisk ~
MS-DOS 3.21 Bootdisk ~
![]() MS-DOS 3.30 Bootdisk ~ Use with
MS-DOS 3.30 Bootdisk ~ Use with
![]() MS_DOS 4.01 Bootdisk ~ Usewith msd401bk.exe to assistin restoring MS-DOS 4.01 Backups
MS_DOS 4.01 Bootdisk ~ Usewith msd401bk.exe to assistin restoring MS-DOS 4.01 Backups
![]() MS-DOS 5.0 Bootdisk ~ Usewith msd50bk.exe to assist inrestoring MS-DOS 5.0 Backups
MS-DOS 5.0 Bootdisk ~ Usewith msd50bk.exe to assist inrestoring MS-DOS 5.0 Backups
![]() MS-DOS 6.0 Bootdisk ~With Dblspace.Bin
MS-DOS 6.0 Bootdisk ~With Dblspace.Bin
![]() MS-DOS 6.20 Bootdisk ~ WithDblspace.Bin ~ Use with msback62.exeto restore Compressed Doublespace Backup Sets.
MS-DOS 6.20 Bootdisk ~ WithDblspace.Bin ~ Use with msback62.exeto restore Compressed Doublespace Backup Sets.
![]() MS-DOS 6.21 Bootdisk ~ Interimversion of MS-DOS supplied with no Disk Compression software.
MS-DOS 6.21 Bootdisk ~ Interimversion of MS-DOS supplied with no Disk Compression software.
![]() MS-DOS 6.22 Bootdisk ~ WithDrvspace. Bin ~ Use with mback622.exeto restore Compressed Drivespace Backup Sets.
MS-DOS 6.22 Bootdisk ~ WithDrvspace. Bin ~ Use with mback622.exeto restore Compressed Drivespace Backup Sets.
![]() MS-DOS 7.10s Bootdisk ~ This is a Special HEX Edited version of the 98se Version 4-10-2222 Bootdisk listed below. It has been patched with 3xStart.exe to allow Windows 3.1 to operate, and Hex Edited so that all references to Windows 98se read as MS-DOS 7.10
MS-DOS 7.10s Bootdisk ~ This is a Special HEX Edited version of the 98se Version 4-10-2222 Bootdisk listed below. It has been patched with 3xStart.exe to allow Windows 3.1 to operate, and Hex Edited so that all references to Windows 98se read as MS-DOS 7.10
![]() MS-DOS 7.10 CD ISO Image (11.6M) ~ Full MSDOS 7.1 installs from CD
MS-DOS 7.10 CD ISO Image (11.6M) ~ Full MSDOS 7.1 installs from CD
 (Windows 9x) MS-DOS BootdiskImages
Microsoft Windows 3.1/3.11 & Windows for Workgroups3.1/3.11 have no Bootdisks as MS-DOS needs to be installed first.
Download MS-DOS version used or if not known ~ try the MS-DOS6.22 bootdisk first.
Microsoft Windows 95 onwards have a corresponding 'Startup Diskette' which from Windows 98 onwards also includes FAT32 & CD-ROM support. But it also creates a RAM Drive which pushes the CD Drive up one letter. The following are the main release versions of Windows DOS as Basic Bootdisks, the same as the above MS-DOS Disks. See Other Bootdisks towards the bottom of the page if you want a complete 'System Bootdisk' as supplied by OEM providers.
(If your Hard Drive is over 520MBs ~ FDISK from Windows 95B and above will ask you if you want 'Large Disk Support' Reply Yes and your Drive will be prepared as FAT32 - Reply No and it will be prepared as FAT16 ~ Its that simple!)
![]() MS-DOS 7.0 Bootdisk (FAT16 OnlyWindows 95 & 95A (4.00.950) ~ Cannot access FAT32 Drives
MS-DOS 7.0 Bootdisk (FAT16 OnlyWindows 95 & 95A (4.00.950) ~ Cannot access FAT32 Drives
![]() MS-DOS 7.10 Bootdisk (FAT16 or FAT32Windows 95B & 95C (4.00.1111)
MS-DOS 7.10 Bootdisk (FAT16 or FAT32Windows 95B & 95C (4.00.1111)
![]() MS-DOS 7.10a Bootdisk (FAT16 or FAT32 Windows 98 & 98se (4.00.2222)
MS-DOS 7.10a Bootdisk (FAT16 or FAT32 Windows 98 & 98se (4.00.2222)
![]() MS-DOS 8.0 Bootdisk (FAT16 or FAT32 Windows Millennium (Me) (4.90.3000)
MS-DOS 8.0 Bootdisk (FAT16 or FAT32 Windows Millennium (Me) (4.90.3000)
For reasons only known to themselves, Microsoft disabled the System Format function on the Windows Me Bootdisk for Floppy Disks. (As well as 'Real Mode' within Windows Me itself! - You can still Format Floppy disks, But you can only SYS a Hard Drive C:\ Partition.
If you need to use a WinMe Bootdisk, Just recreate this image as often as you want.
Windows XP produces a MS-DOS 8.0 (Win Me) Bootdisk, which cannot be used to access a NTFS harddrive.
Windows 9x OEM Start-up Diskette Images
The following MS-DOS 'Bootdisks' were provided by OEM suppliers for the sole purpose of installing Windows 9x
They had no other purpose than to prepare a PC for Windows Setup. They were not designed as 'Recovery Disks'
![]() Windows 95/95a OEM Start-up Disk with added CD-ROM Support
Windows 95/95a OEM Start-up Disk with added CD-ROM Support
Modified with CD-ROM support by Ed Jablonowski of Bootdisk.Com
![]() Windows 95b/c OEM2 Start-up Disk with added CD-ROM Support
Windows 95b/c OEM2 Start-up Disk with added CD-ROM Support
Modified with CD-ROM support by Ed Jablonowski of Bootdisk.Com
![]() Windows 98 OEM Start-up Disk with CD-ROM Support
Windows 98 OEM Start-up Disk with CD-ROM Support
Standard Microsoft OEM 1.44MB Start-up Diskette
![]() Windows 98se OEM Start-up Disk with CD-ROM Support
Windows 98se OEM Start-up Disk with CD-ROM Support
Standard Microsoft OEM 1.44MB Start-up Diskette
![]() Windows XP Pro SP1 (includes Corp) 6 disks
Windows XP Pro SP1 (includes Corp) 6 disks
![]() Windows Me OEM Start-up Disk with CD-ROM Support
Windows Me OEM Start-up Disk with CD-ROM Support
Standard Microsoft OEM 1.44MB Start-up Diskette
Note: Windows NT 3.51, 4.0, 2000 & XP Diskettes are no longer available here - Use Bootdisk.Com
 IBM-DOS BootDisk Images
![]() IBM PC DOS 7.0 (PC-DOS 7.0 Rev 0) Bootdisk
IBM PC DOS 7.0 (PC-DOS 7.0 Rev 0) Bootdisk
![]() IBM PC DOS 2000 (PC-DOS 7.0 Rev 1 - Also known as PC-DOS 7.01) Bootdisk
IBM PC DOS 2000 (PC-DOS 7.0 Rev 1 - Also known as PC-DOS 7.01) Bootdisk
![]() IBM PC DOS 2000 (PC-DOS 7.0 Rev 1 - Also known as PC-DOS 7.01) CD ISO
IBM PC DOS 2000 (PC-DOS 7.0 Rev 1 - Also known as PC-DOS 7.01) CD ISO
DR-DOS BootDisk Images
![]()
![]()

![]()
![]() OEM DR-DOS 7.05 Bootdisk as developed by Caldera for OnTrack & Seagate
OEM DR-DOS 7.05 Bootdisk as developed by Caldera for OnTrack & Seagate
Caldera & Lineo have withdrawn all support for DR-DOS on its sale to DeviceLogics in November 2002

Full versions of OpenDOS 7.01 ~ DR-DOS 7.02 & 7.03 may still available from :
![]() http://www.drdos.net/download.htm
http://www.drdos.net/download.htm
![]() http://public.planetmirror.com/pub/drdos/
http://public.planetmirror.com/pub/drdos/
Devicelogics have released a new version of DR-DOS (DR-DOS 8.0) but so far it is not available for free download.
Custom Bootdisks
![]() .Plain MS-DOS 6.22 Bootdisk with no additional files ~ For loading Flash BIOS updates (Obtain BIOS update from relevant source and copy to disk)
.Plain MS-DOS 6.22 Bootdisk with no additional files ~ For loading Flash BIOS updates (Obtain BIOS update from relevant source and copy to disk)
![]() MS-DOS 6.22 CD-ROM Setup Disk ~ In the same style as the later Windows 9x Bootdisks - Checks harddrive & installs CD-ROM Driver.
MS-DOS 6.22 CD-ROM Setup Disk ~ In the same style as the later Windows 9x Bootdisks - Checks harddrive & installs CD-ROM Driver.
![]() The CDROMGOD Disk Version 5.5 - A MS-DOS 7.0 Bootdisk with CD-ROM detector & installer
The CDROMGOD Disk Version 5.5 - A MS-DOS 7.0 Bootdisk with CD-ROM detector & installer
![]() MS-DOS 7.10 Bootdisk (Self-Extracting IMZ Version) ~ This is a Special HEX Edited version of the 98se Version 4-10-2222 Bootdisk listed below.It has been patched with 3xStart.exe to allow Windows 3.1 to operate,and Hex Edited so that all references to Windows 98se read as MS-DOS 7.10
MS-DOS 7.10 Bootdisk (Self-Extracting IMZ Version) ~ This is a Special HEX Edited version of the 98se Version 4-10-2222 Bootdisk listed below.It has been patched with 3xStart.exe to allow Windows 3.1 to operate,and Hex Edited so that all references to Windows 98se read as MS-DOS 7.10
![]() OLDBIOS CD Bootdisk (Self-Extracting IMZ Version) ~ For older BIOS's Due to incompatibility with CD-booting technical specifications, "El Torito" standard, no-emulation method of CD Boot. Try using thisdisk. This program will create a floppy disk to work around this problem.
OLDBIOS CD Bootdisk (Self-Extracting IMZ Version) ~ For older BIOS's Due to incompatibility with CD-booting technical specifications, "El Torito" standard, no-emulation method of CD Boot. Try using thisdisk. This program will create a floppy disk to work around this problem.
You boot the PC from this floppy and then a small program on the floppy switches boot to a CD-ROM device .
Note:this program will be useless if your PC can normally boot from installation CDs. - Works with 95% of IDE CD-ROM's
Boot CD's
![]()
Hiren's Boot CD v7.7(178.25MB)
Hiren's Boot CD v9.1(74,596MB)
Hiren's Boot CD v9.3(82,148MB)
Hiren's Boot CD v9.5(97.728MB)
Hiren's Boot CD v9.8(162.040MB)
Hiren's Boot CD v9.9(182.526MB)
Hiren's Boot CD v10.1(199.302MB)
Hiren's Boot CD v15.2(1595MB)
To create a USB Flash Hiren's 15.2:
1. Under Hiren's BootCD Program Launcher select Partition/Boot/MBR then
select RMPrepUSB (Make USB Bootable).
2. Under 3 Bootloader Options, select XP/BartPE bootable (NTLDR).
Under 4 Filesystem and Overrides, select FAT 32.
Under 5 Copy OS files click Choose Copy Folder and select the drive letter root such as D:\
On the right, select 6 Prepare Drive.

3.After preparation and copy, on right, select Install grub4dos. Just press enter. When it is done, you
should have a bootable hiren's USB flash drive.
OverviewCurrent release: 4.1.1 For those of you interested in a Windows version of the Ultimate Boot CD, you might want to check out this project initiated by Ben Burrows. Ultimate Boot CD is completely free for the download, or could be obtained for a small fee. If you had somehow paid a ridiculous amount of money for it, you have most likely been fleeced. The least you could do is to make as many copies of the offical UBCD and pass it to your friends, relatives, colleagues or even complete strangers to minimize the per unit cost of your loss! 
You need the Ultimate Boot CD if you want to:
When you boot up from the CD, a text-based menu will be displayed, and you will be able to select the tool you want to run. The selected tool actually boots off a virtual floppy disk created in memory. Tools currently included in the Ultimate Boot CD are:
http://www.bootdisk.com Highly
Recommended http://www.drd.dyndns.org/index2.html http://support.mpccorp.com/downloads/boot.html USB DOS Resources Bootdisk Add-On Modules: Universal (Oak Technoligies) CD-ROM Bootdisk Add-On
Adaptec SCSI CD-ROM Driver Kit
Microsoft MSCDEX
Microsoft Basic Mouse Driver Version 8.2
FastLynx Version 2.0 File Manager/Transfer Utility
LapLink Pro Version 4.0 with Text Editor
Microsoft InterLink/InterServer
To create a basic boot disk, follow the instructions below: Ensure you have a blank formatted floppy disk available.
Although the disk shouldn't strictly need to be formatted or
blank, problems have been recorded where using disks that
weren't. Type the following: FORMAT A: /S This will create a basic bootable floppy disk. Unfortunately,
it won't allow you to do much. To perform any system tasks, you
will need a few of the utilities that DOS / Windows provides.
These are separate executable files and will be stored one of two
places: It is recommended that at very least you copy the
following files: FDISK.EXE, FORMAT.COM, SYS.COM & EDIT.COM
(and if running MS-DOS 6.22, QBASIC.COM). These will provide you
with enough to allow you to reformat your hard drive, or delete
and re-create partitions. If you wish to include CD support from
your boot disk, you will also need MSCDEX.EXE , you will also
need to copy over your CD driver (*.SYS) and create suitable
AUTOEXEC.BAT and CONFIG.SYS files to ensure they load
successfully. Refer to your CD-Player documentation for more
details. (Or use our Universal IDE CD-ROM Driver Add-On listed
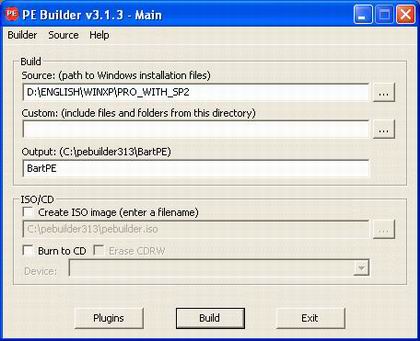
above) How to Boot XP From a USB Flash Drive Takeaway: You can't boot Windows XP from a floppy disk the way you used to be able to with DOS. One handy way to easily boot XP is by using a USB flash drive. Here's how to make it work. Almost everyone who has worked with computers for any length of time at all has run into at least one situation in which a problem left a PC unbootable. What if you could return the machine to a bootable state just by inserting a USB flash drive though? Believe it or not, it is actually possible to install a bootable copy of Windows XP onto a flash drive and then boot a PC off of the flash drive. From there, you can use applications that you have installed on the flash drive (anti virus, anti spyware, disk repair, etc.) to fix the PC's problem. In this article, I will show you how. What's the catch? As with most cool new techniques, there are a few catches. For starters, not every PC is capable of booting from a USB flash drive. For the most part, computers manufactured within the last two years are generally able to boot from a flash drive. Older systems may require a BIOS update, or might not be able to boot from a flash drive at all. Another catch is that not every flash drive will get the job done. The primary factors that limit your use of a particular flash drive are capacity and speed. Technically, speed isn't really a limiting factor, but booting Windows will be painfully slow unless you use a flash drive that supports USB 2.0. The flash drive's capacity is actually a limiting factor though. Surprisingly though, there are size limits on both the upper and lower end. Your flash drive can't be too large or too small. There isn't really a documented minimal size for a flash drive. You just need something large enough to hold Windows XP and a few applications. As you probably know, Windows XP normally consumes over a gigabyte of disk space. Later I will show you how to use a free utility to trim the excess fat off of Windows XP and make it a whole lot smaller. Even so, I still recommend that your flash drive be at least a minimum of 256 MB in size. As I mentioned, there is a maximum size for the USB flash drive that you can use. Currently, USB flash drives exist in sizes of up to 4 GB, and 8 GB flash drives are expected to be available by the end of the year. As nice as it would be to have 8 GB to play with, the flash drive that you use for this project can be no larger than 2 GB. The reason for this is because you will have to format the flash drive using the FAT-16 file system, which has a 2 GB limit. Presently, you are stuck using FAT-16 because most computers will not recognize a flash drive as being bootable if the drive is formatted with anything other than FAT-16. Preparing your Windows installation CD One of the requirements for creating our bootable USB flash drive is a Windows XP with Service Pack 2 installation CD. If your Windows XP installation CD doesn't already include Service Pack 2, then you will have to make a CD that includes Service Pack 2 through a technique called slipstreaming. Other requirements In addition to your Windows XP installation CD, there are a couple of other things that you are going to need. For starters, you will need the HP USB Disk Storage Format Tool. You can download this tool for free. Get It Another utility that you are going to need is Bart's Preinstalled Environment Bootable Live Windows CD / DVD, or BartPE for short. You can download this utility for free. Get It. PEBuilder web site. In addition to the software requirements, you must verify that the PC that you will be using to create the Windows deployment has 1.5 GB of free hard disk space (minimum) and supports booting from a USB device. I also strongly recommend that the PC be running Windows XP Service Pack 2. Prior to Service Pack 2, Windows XP sometimes had trouble interacting with USB storage devices. Formatting the flash drive Now that you have all of the prerequisites taken care of, it's time to actually start setting up our flash drive. The first step in doing so, as strange as it sounds, is to format the flash drive. Windows will actually let you format a flash drive in the same way that you format a floppy disk. However, formatting a flash drive in this way will not work for this project. Furthermore, using Windows to format a flash drive directly has been known to destroy some types of flash drives. Instead, you must format the flash drive by using the HP USB Disk Storage Format Tool that you downloaded earlier. To do so, simply open the utility, select the device followed by the FAT file system option and click Start. Once the device has been formatted, you must make it bootable. To do so, you must copy the BOOT.INI, NTLDR, and NTDETECT from the root directory of your PC's boot drive to the flash drive. These files are hidden by default, so you will either have to configure Windows Explorer to show hidden files (including protected operating system files) or you will have to open a Command Prompt window and use the COPY command to copy the files. If you choose to use the Windows Explorer method, then open Internet Explorer and enter C: into the address bar so that you are looking at your local hard drive. Next, select the Folder Options command from the Tools menu. When the Folder Options properties sheet opens, select the View tab. Now, just select the Show Hidden Files and Folders and deselect the Hide Extensions for Known File Types and the Hide Protected Operating System Files check boxes. Click OK to continue. Booting from the USB flash drive Now that you have formatted your USB flash drive and installed the boot files onto it, the next thing that you must do is to configure your PC to allow you to boot from the flash drive. This is all done through the computer's BIOS Setup. I can't give you specific instructions for this part, because every computer is different. I can give you a few pointers though. You can access your computer's BIOS by pressing a specific key immediately after you turn the PC on. The key varies, but it is usually either [F1], [F2], or [Delete]. Once you are in the BIOS Setup, you should verify that all of your computer's USB options are enabled. This might include things like support for legacy USB devices or support for USB 2.0. If there is a time out setting for USB devices, you should set it to the max to insure that the system doesn't time out while waiting on the USB device to boot. Next, find the section on boot device priority. Normally, a USB flash drive (which is usually listed as USB-HDD, but may be listed as a removable device) will have a very low boot priority. If the USB flash drive's boot priority is lower than the hard disk (listed as HDD) then the only time the computer would ever boot off of the USB flash drive is if the system were to fail to boot from the hard disk. You must therefore rearrange the boot device priority so that the flash drive has a higher priority than the hard drive. Configuring Windows Now that we have finally made it through all of the prep work, it's time to start setting up Windows. As you have probably already guessed, the process of installing Windows to a flash drive is quite a bit different from your normal, run of the mill installation. There are a couple of reasons for this. For starters, a full blown Windows XP deployment takes up over a Gigabyte of hard disk space. When you are installing to a flash drive, disk space is a scarce commodity. Even if you have over a Gigabyte of space on your flash drive, you probably don't want to use it all on Windows. It would be nice to have room to install a few applications. Therefore, you need to trim the excess fat off of Windows. The other reason why the installation process is so different from the usual Windows installation is because Windows Setup is not designed to install Windows to a flash drive. You therefore have to configure Windows using an alternate method. The PEBuilder utility that you downloaded earlier can take care of both of these issues. PEBuilder is designed to create a build of Windows XP (or Windows Server 2003) that does not take up as much space as a full blown installation. Once you create this new build, you can copy it to the flash drive. For right now, I will show you how to create a basic Windows build and copy it to the memory stick. Unfortunately, it's rather difficult to install applications once Windows is up and running. Therefore, after I show you how to create a basic Windows build, I will show you how to create a build that includes some applications. Begin the process by opening PEBuilder. When you open PEBuilder, you will see a screen similar to the one that's shown in Figure A. Simply enter the path to the Windows installation files (the ones from your Windows XP with Service Pack 2 installation CD). Next, verify that the Create ISO Image and the Burn to CD check boxes are not selected and then click the Build button. PEBuilder will now create the new Windows build. Figure A
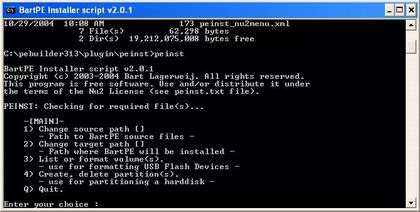
You must use PEBuilder to create a Windows build that will work with a flash drive. Now, it's time to copy Windows to the flash drive. To do so, you will have to use a special batch file that's included with PEBuilder. Open a Command Prompt window and navigate to c:\pebuilder313\plugin\peinst. Now, insert an empty flash drive into the computer's USB port and then execute the file PEINST.CMD. You will now see a menu appear as shown in Figure B. Figure B
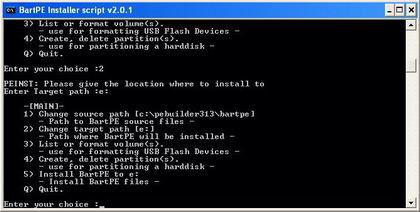
PEBuilder uses a batch file to install Windows onto a flash drive. Type 1 and press [Enter] and you will be prompted to enter the path to the build that you have created. Enter C:\pebuilder313\BartPE. Now, type 2, press [Enter], and you will be prompted for the target path. Enter the drive letter that Windows has assigned to your USB flash drive. After doing so, the menu is updated as shown in Figure C. The menu now displays the source path and the destination drive. Type 5 and press [Enter] to install Windows to the flash drive. Figure C
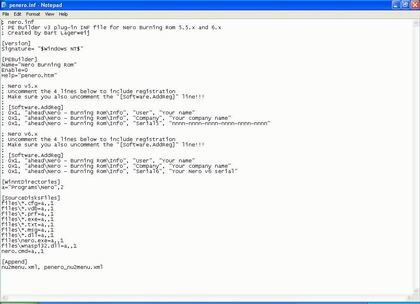
Use menu option 5 to install Windows to the flash drive. Installing applications Now that I have shown you how to create and install a basic Windows build, I want to talk for a moment about how you can add an application to the build (prior to creating it). The PEBuilder program comes pre-configured to support a number of common Windows applications, but does not come with the applications themselves. The reason why installing applications can be a little bit tricky is because most Windows applications modify the Windows registry. The build that you are creating is basically a collection of installation files, and the build itself does not contain a registry (the registry gets created when Windows is installed onto the flash drive). As such, PEBuilder uses a sort of registry emulator. If you go to the C:\PEBUILDER313\PLUGIN folder, you will see sub folders for a number of different applications. If you open one of these application folders, you will see that the folder contains an INF file and a FILES folder. The INF file contains all of the information that would normally go into the registry, and the FILES folder stores all of the program's files. To see how this works, let's install an application that I'm sure most of you are familiar with; Nero. Begin by installing Nero onto the machine that's running PEBuilder, as if you planned to run Nero locally on that machine. When the installation completes, copy all of the files from C:\Program Files\ahead\Nero to C:\pebuilder313\plugin\nero burning rom\files. In this particular case, the nero burning rom folder is the folder that has been set aside for the Nero application. The Files sub folder is intended to store Nero's system files. Now, you must take care of Nero's registry entries. To do so, go to the C:\pebuilder313\plugin\nero burning rom folder and open the PENERO.INF file using Notepad. As I explained earlier, the INF file in an application's folder is used to store the application's registry entries. For Nero and all of the other applications that PEBuilder predefines, the INF file is pre-configured. You just have to make a few changes that are specific to your system. In this particular case, the PENERO.INF file is designed to support both Nero versions 5.x and 6.x. Initially, the lines for both versions are commented out. You must therefore determine which version you have and then remove the semi colon from the beginning of the lines that apply to that version. If you look at Figure D, you can see how the two versions are separated. Figure D
An application's registry entries are stored in an INF file. Once you uncomment the appropriate lines, just replace "Your Name", "Your Company Name" and "Your Serial Number" with your name, your company's name, and your Nero product key. Save the file, and your set to go. The next time that you click the Build button, Nero will be included in the build. Putting XP in your pocket Running Windows from a flash drive isn't an exact science. Sometimes the process just doesn't work and there is no good reason why. As more PCs start to support booting from USB devices though, USB boots should become more standardized, and the technique should become more reliable. | |||||||||||||||||||||||||||||||||||||||||||||||||||||||||||||||||||||||||||||||||||||||||||||||||||||||||||||||||||||||||||||||||||||||||||||||||||||||||||||||||||||||||||||||||||||||||||||||||||||||||||||||||||||||||||||||||||||||||||||||||||||||||||||||||||||||||||||||||||||||||||||||||||||||||||||||||||||||||||||||||||||||||||||||||||||||||||||||||||||||||||||||||||||||||||||||||||||||||||||||||||||||||||||||||||||||||||||||