
THE REAL-80 EMULATOR
REAL-80 - Real-Time Videogenie-I / HT1080Z Emulátor
Pictures in the documentation can be enlarged!
System requirements
Emulator properties
Starting the first time
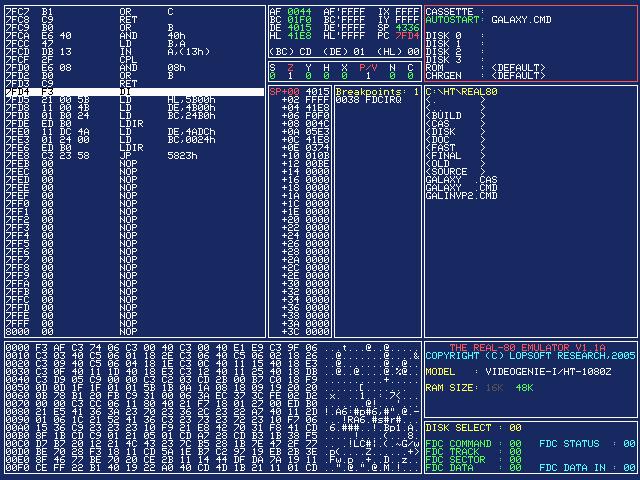
When starting the emulator the first time, it will run according to the default settings:
The tape recorder
The tape recorder emulation works in real-time mode. This means,
that independent of the file format, but there are some conditions: the tape
writing always starts with 255 pieces 00h character. This way when reading its
easier to find the beginning of the file, as well as the sign pitch. Actually
there is also another reason for this; because of the write/read mode it must
read at least 8 pcs of 0 bits continuously,
before the data. The file on the
start does not need to contain 255 pcs 00h character, 2 pcs are enough but it
can also be more.
The file extension can be ASM, BAS or CAS. This way not every file includes the data, so the emulator supports some frequent file formats:
Inserting/removing a tape
Push the F2 key to step into the File Manager:
After inserting the tape the Directory window will appear, were you can move with the cursor up and down key and choose the desired file or directory with the enter key. With the ESC key you can interrupt this function.
Only the ASM, BAS and CAS file types will be visible in the list.
Return to the emulator with the F2 or ESC key, to open the Debugger push the F1 key.
Auto start
With auto start, machine code programs can load faster. This function can load CAS and CMD file formats.
Steps are similar to the tape insert; only this time you must choose the AUTOSTART function. After selecting the file, press Enter to load the program into the memory, the program will set the PC to the start address and a message will appear telling if loading was successful also if there has been a file format error. The program will start instantly after returning to the emulator. There is also the possibility to step into the debugger with the F1 key. This way the program can be debugged.
Inserting/removing a disk
Same as the tape insert, only now choose any of the DISK select functions. The system can only boot from DISK 0, here we place the system disk. If the DISK 0 is empty the emulator will turn off disk emulation and the system will start in Basic after reset.
The emulator supports the most common DSK formats up to 40 Track.
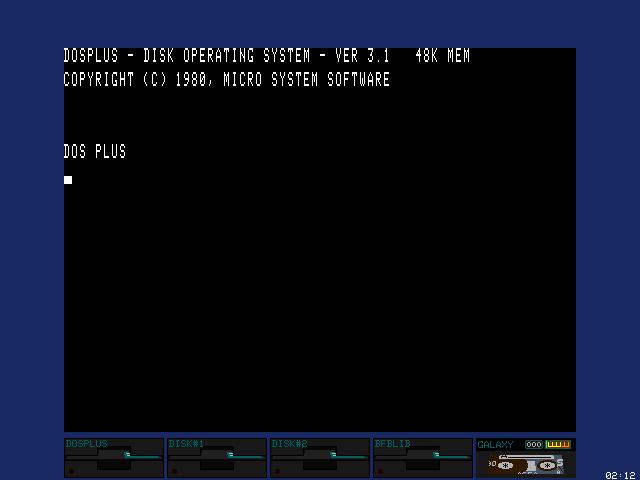
Screen snapshot with inserted tape and disc
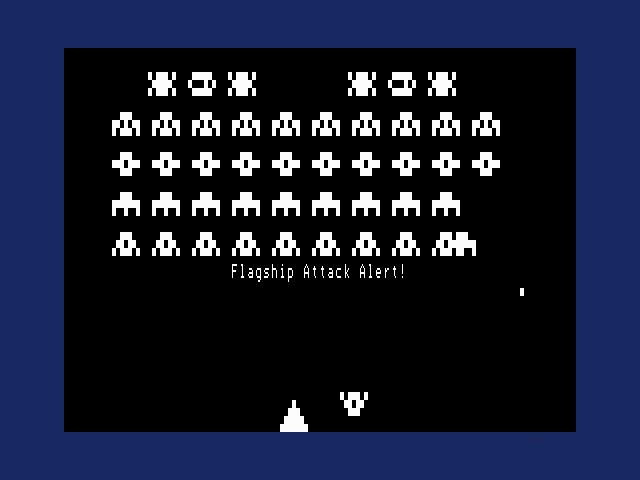
Screen snapshot with hidden drives and clock
Loading/Removing ROM and character set
Same as the tape insert, only now choose the ROM or CHRGEN line. After choosing a ROM file with a maximum of 3780h or 1000h bytes length respectively, the new ROM or character set will be loaded. Also a reset will occur, this way the program always starts from the 0000h address. This way you can run not only the standard manufacturer ROM but your own ROMs as well.
The file extension for ROM will be '.ROM', for the character set '.CHR'. To return to the default ROM or character set press the DEL key.
Since the debugger also uses the system character set, it might - in case of an inadequate ode - become unreadable. When deleting the INI file the system will reset itself to the default setting.
The built-in Debugger
The emulator includes a built-in debugger, which can be reached
through the F1 key.
Debugger
windows:
Push TAB to move between the windows.
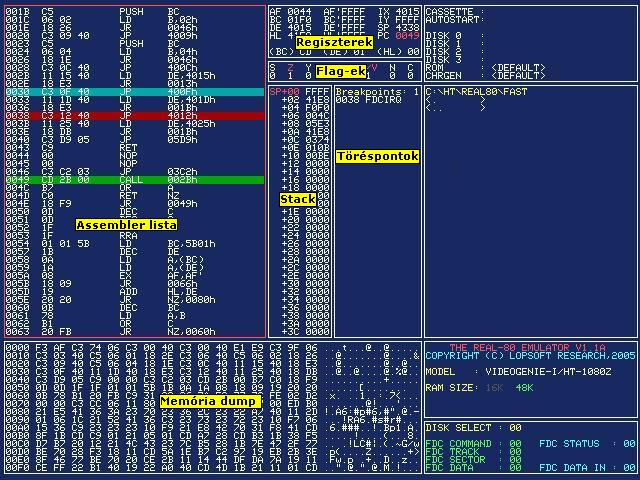
Assembler list
When stepping into the debugger the assembler list cursor will step into the actual PC value. Some times the cursor is not visible, since the programmer used such kind of tricks that one command operates another and this way the program will jump there. The debugger can also search backwards and displays the commands exactly.
Move the cursor with the up/down keys, move the pages with the PgUp/PgDn keys.
Change the cursor address with the Enter key.
F7 Trace Into - execute a command
F8 Step Over - execute a command, the CALL and RST commands
will be called
F4 Go To Cursor - run the program
till it reaches the cursor position
F9 Run - run
the program (ESC or F1
will do the same)
F6 Toggle Breakpoint - turn
on/of the breakpoint of the cursor position
F10
New PC - the PC value will be the same as the cursor position
F5 Toggle between debugger and emulator screen.
While running the debugger it will change back to the emulator screen only after the first screen refresh, (1/60 sec).
Memory dump
The memory will display 256 bytes in hexadecimal and ASCII format and also serves for editing the writable memory zone. Move the cursor with the up/down keys, move the pages with the PgUp/PgDn keys. Change the cursor address with the Enter key. You can also return to the assembler list by pressing the Backspace key. It will save the window address when leaving the emulator.
Registers
The CPU registers can be changed, except the PC, which can be changed only from the assembler list with the F10 key. The green color of the register values shows that they have changed since the last stop, or have been changed manually. Move the cursor with the up/down keys, return to the assembler list with Enter.
Flag register
The flags can be changed. If the flag value is 1 its name will be displayed in red, this way you can keep track of it more easily. The flag value is green, if it has changed since the last stop, or has been changed. Move between the flag values with the left/right keys, return to the assembler list with Enter.
Stack content
Shows the stack content, can not be changed. In case a change is necessary, this can be done via the memory dump.
Breakpoint list
Shows the breakpoint address, for easy identification a short name can be added. One an delete the name with the DEL key. On pressing the Enter key, the assembler list cursor will be placed onto the input. On exiting, the emulator will save the list.
Screen snapshot
With Alt-F1 the visible screen will be copied into a BMP file. The file will be placed into the emulator folder, the name will be REAL####.BMP, were #### is the first not existing line number beginning from 0000.
Options
The memory size can be changed (16K/48K). If a change occurrs the emulator resets itself.
Key summary
Key allocation
1
2 3 4 5 6 7 8 9 0 : - left arrow
Break Q W E R T Y U I O P
@
A S D F G
H J K L
;
Z
X C V B N M , .
/ up/down/left/right
Home -
Clear
Enter - New Line
Program Property
1. The program is the property of Mr.
Zoltán Kollár.
2. The program can be used, copied and distributed by
everyone.
3. The program is free, this way no fee may be asked for it by
anyone.
4. The program can solely be altered by the
author.
Comments or ideas can be sent to zka@freemail.hu
English documentation
Thanks to Mr. Levente Szűcs and Mr. Attila Grósz.
(Zoltán Kollár)